Words and Photos (including
the bad ones) by Simon Bradley
So last time
we looked at some of the basics and
the terms that get bandied around, and got an idea of the
kit we could use and the limitations that go with it. This
time, as promised, we're going to have a look at some techniques.
A stationary motorcycle is just another machine.
Just a collection of machined and moulded parts, and no more
worthy of artistic attention than a cement mixer. Now you
may choose not to believe that - it's a pretty outrageous
statement, after all - but you'd still have to agree that
to capture the essence of what a bike is all about you really
have to photograph it in action. Don't you?
No. Of course
you don't. Probably 90% of the pictures we use on this
site are of static bikes. Because that shows off what the
bike looks like and removes distractions like a rider and
moving background. But what makes the difference between a
nice static bike shot and a less nice one?
 Ah
yes. Now this is a bike that it's actually very difficult
to photograph badly. I mean, look at it. It's a fantastic
shape, the detailing is amazing and it's one of the very few
bikes that actually looks scary, even when it isn't moving.
The Cagiva Raptor, for that's what it is, is definitely aptly
named. Ah
yes. Now this is a bike that it's actually very difficult
to photograph badly. I mean, look at it. It's a fantastic
shape, the detailing is amazing and it's one of the very few
bikes that actually looks scary, even when it isn't moving.
The Cagiva Raptor, for that's what it is, is definitely aptly
named.
And yet this photo entirely fails to capture any of that. The details get lost in the fussy
background, which is far too clear, and the unimaginative
angle serves to flatten the whole bike and lose the aggressive
stance further. Then add the slight underexposure that makes
the engine and radiator detail disappear into shadow and you
get a study in disappointment. When I took this, all I could
do was thank God for digital and the facility to check that
a shot was OK before finishing the session. If this had been
film I might never have noticed, because I'm not an intuitive
photographer - I need to see my mistakes to learn from them.
Which gets a little awkward if the first you see of them is
when your shots come back from the developer...
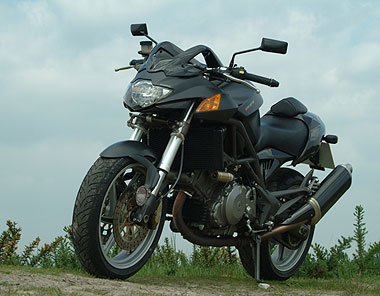
 Same
bike, same day, about a mile down the road. Still not
perfect - the area of shadow under the tank masks some of
the detail more than I'd like - and I should have done something
to hide the stone under the sidestand. But what an improvement.
The predatory look of the bike is accentuated by the low angle
which, conveniently, gets rid of most of the background as
well, replacing it with sky. So no confusing details to worry
about. Same
bike, same day, about a mile down the road. Still not
perfect - the area of shadow under the tank masks some of
the detail more than I'd like - and I should have done something
to hide the stone under the sidestand. But what an improvement.
The predatory look of the bike is accentuated by the low angle
which, conveniently, gets rid of most of the background as
well, replacing it with sky. So no confusing details to worry
about.
This shot is something of a cliche, to be
honest, but it proves one thing - photographic cliches, whether
young ladies in wet tee shirts or bikes taken from low down
have become established as such because they are an easy and
reliable way of showing off the parts of the subject you want
to accentuate to the fullest effect. It also shows how much
difference you can get from just a foot or so of movement,
either up or down, from the normal eyeline.
It's actually
quite difficult to get a good shot of a stationary
bike. There are lots of shadows, lots of reflections and lots
of detail bits to try and capture, and as a result your camera,
which is nowhere near as sophisticated an imaging system as
your eye, struggles to get everything balanced. So remember
to review your shot, assuming you can, before moving on to
the next thing.
And the next thing, of course, is moving
bikes. Now this is an area which, paradoxically, is both easier
and harder to do. It's harder to get the composition of the
shot right, but it's easier to make it work when you do.
 Being
in the right place at the right time is always useful, and
this shot was completely spontaneous - I happened to be there
when Toseland came into the pits. As he swung across into
the garage, though he wasn't going very fast, the movement
relative to everything around him was enough to give a great
impression of action. I love this shot. Being
in the right place at the right time is always useful, and
this shot was completely spontaneous - I happened to be there
when Toseland came into the pits. As he swung across into
the garage, though he wasn't going very fast, the movement
relative to everything around him was enough to give a great
impression of action. I love this shot.
Actually, I've just unwittingly let you into
one of the secrets of bike journalism. Get the angles right
and you can create the impression of going very fast indeed
when you're actually not. This is surprisingly useful. Unfortunately,
sometimes it works and sometimes it doesn't. Conversely, I've
taken plenty of shots where my subject has been absolutely
flying...but it has looked as though there's all the time
in the world for me to have done it in oils instead.
This shot, by the way, also illustrates two
other points. If there may be something around then never
turn your camera off or put the lens cap on. Because
you'll miss something, for sure. And if you can possibly get
something with a motor drive then do so. This shot is one
of a sequence of five, and it's the only one that worked properly.
 This little gem, taken at Brands Hatch in 2003, shows what
happens when panning goes wrong.
I'm using a fast enough shutter speed to lose the movement
of the bike in the frame, but basically I'm not moving fast
enough. I set the shot up, panned with the bike, released
the shutter and...got this. This little gem, taken at Brands Hatch in 2003, shows what
happens when panning goes wrong.
I'm using a fast enough shutter speed to lose the movement
of the bike in the frame, but basically I'm not moving fast
enough. I set the shot up, panned with the bike, released
the shutter and...got this.
I probably ought to explain what panning
is. Just in case. Very simple, really. It's a flash term for
following the subject with the camera. Or, more likely, with
your entire upper body, because that's the way you're most
likely to be able to track the subject, see through the viewfinder
and avoid dropping the camera. These are all important. To
make panning work you need to get the subject into the viewfinder
way before you take the shot, then follow through until the
subject gets to where you want the shot. then keep panning
while the shutter releases. If you're a purist then you will
have manually focussed your camera at the point you want the
shot, and will know when to press the button. This may also
be the case if your camera doesn't have an autofocus facility.
Otherwise, try to keep your subject in the middle of the viewfinder
because usually that is the sweet spot for focussing.
 Same
day, same bike, same corner. This is the shot I was aiming
for and a couple of laps later I got it. The composition is
wrong for a classic shot - remember we talked about the "Rule
of Thirds" before - but the rest of it seems to have
worked OK. Same
day, same bike, same corner. This is the shot I was aiming
for and a couple of laps later I got it. The composition is
wrong for a classic shot - remember we talked about the "Rule
of Thirds" before - but the rest of it seems to have
worked OK.
There is a simple fudge to make panning easier.
I've actually used it here to an extent, but it's more obvious
in the next shot. If a bike (or car or bird or whatever) is
moving fast in front of you then you have to pan fast because
the angle is changing fast. But if you move so that, instead
of just crossing your field of view, the subject is coming
towards you as well, you reduce the angular velocity and so
make it easier to pan.
Of course, this technique relies on you either
having a camera capable of staying in focus on something moving
towards you at high speed or your choosing a point to take
the shot and manually setting the focus to get it. If you're
going to do that then you need to find a convenient reference
point in the background that you'll see through the viewfinder...
 Here's
an example of what I mean.
Cooper Straight at Brands Hatch is a critical part of the
circuit and it's fast, too. At this point the riders are just
braking for Surtees, the long left hander leading to Pilgrims
Drop, the fastest part of the circuit. My position allowed
me to minimise the panning I had to do to get sharp shots. Here's
an example of what I mean.
Cooper Straight at Brands Hatch is a critical part of the
circuit and it's fast, too. At this point the riders are just
braking for Surtees, the long left hander leading to Pilgrims
Drop, the fastest part of the circuit. My position allowed
me to minimise the panning I had to do to get sharp shots.
The other thing you can do, and I used this
here as well, is to distance yourself from the action. A fast
moving object further away doesn't cross your view so fast
and so is easier to track. Obviously you'll need a bigger
lens and the downside is that, like here, the picture gets
flattened rather, losing a lot of depth. But if a race is
close, as it was here, you can use that to convey how tight
the competition actually is as well...
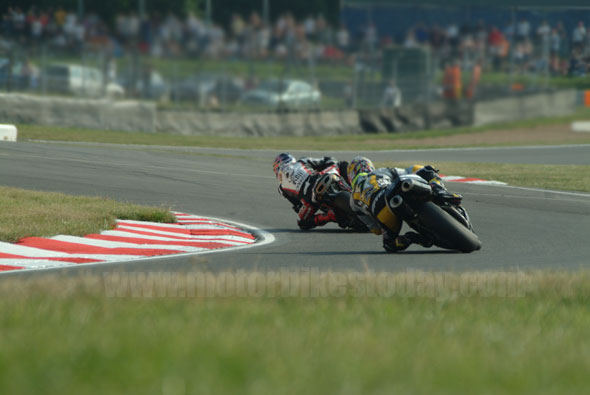
Finally for today. Don't be afraid
to try something different. You never know what might
happen. For this shot I lay down behind the crash barrier
and took the shot as the riders went away from me. It took
a few goes to get right but I think the result was worth the
effort...

|